RPG Maker Sprite Maker: Create Characters for MV and MZ
On this page
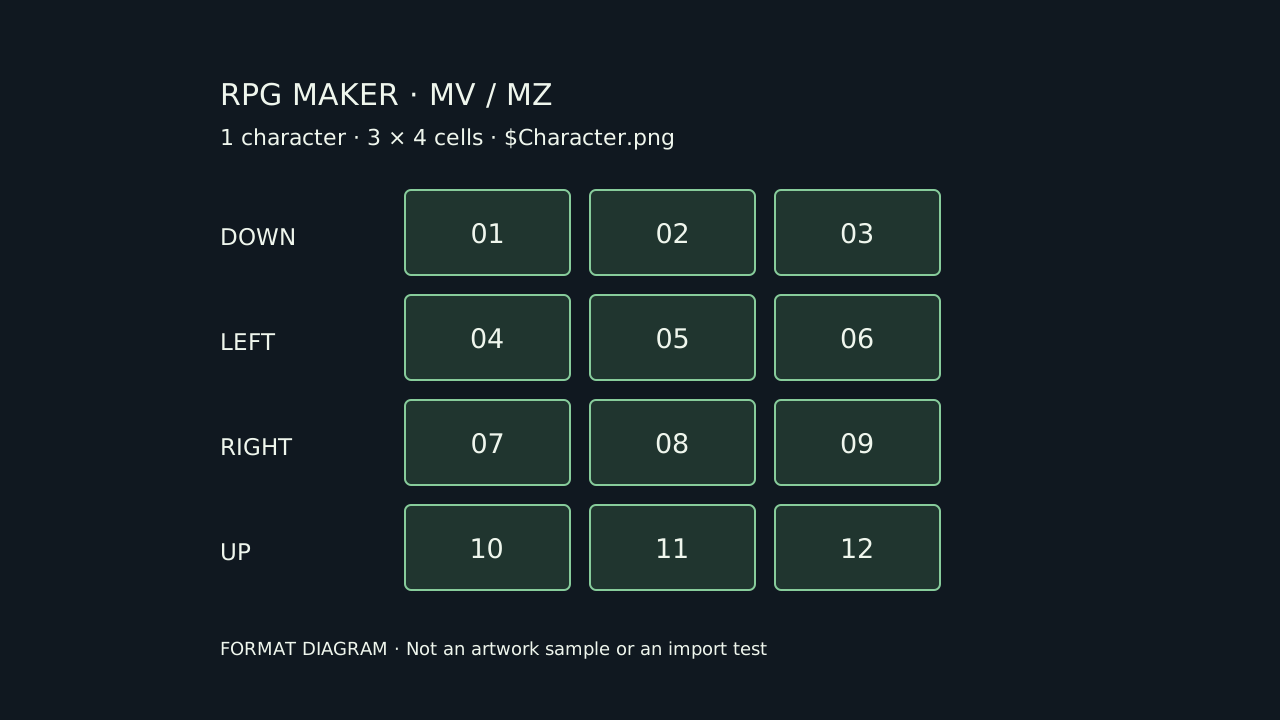
A character that looks good in a preview still needs to turn, walk, and stand correctly on your map. When you use an RPG Maker sprite generator, the useful result is a consistent character in the layout your project expects—not just a picture of a hero.
You can start generating character animations with SpriteGen, then prepare the frames for RPG Maker MV or MZ. This guide covers map walking characters. Portraits, enemies, and side-view battle actors use different asset formats.
Can I import the generated sprite sheet directly?
The illustration above is a layout diagram, not generated character artwork or a completed import test. Check your output layout first. SpriteGen generates animation frames and exports sprite sheets, but its general-purpose output is not a dedicated RPG Maker character-sheet preset. You may need to select frames and rearrange them before importing.
For a single map character, prepare a transparent PNG with three columns and four rows. Each row contains three walking patterns for one direction; arrange the rows down, left, right, then up. Prefix the filename with $, for example $ForestScout.png, so the engine treats the sheet as one character.
If you choose 48 × 48 pixel cells, that single-character image is 144 × 192 pixels. The cell size is not locked to 48 × 48: larger characters can use larger cells, provided the grid remains consistent. See the official MV asset standards and MZ asset standards.
Do not add $ to an arbitrary animation strip and expect it to become compatible. The name changes how the engine divides the image; it does not rearrange its frames.
How do I make a character that walks in four directions?
Start with a simple design that is easy to recognize from every angle. Keep the outline readable and limit tiny accessories. Choose a map-style perspective rather than a dramatic side-view combat pose.
Here is a starting description to adapt:
A small forest scout for a top-down fantasy RPG. Short brown hair, green tunic, brown boots, a small tan shoulder bag, no weapon in hand. Clear pixel-art silhouette, consistent proportions, transparent background.
Generate the walking action, then use the same character reference for the remaining directions. Describe the direction explicitly and preserve the clothing, colors, and equipment. These are prompt suggestions, not a guarantee of identical results.
For example:
The same forest scout walking away from the camera, viewed from behind. Preserve the green tunic, brown boots, tan shoulder bag, body proportions, and pixel-art style. Keep the whole character visible.
Review each direction before generating more. A side-view loop alone does not supply the front and back views, and a mirrored image may put a one-sided bag or weapon on the wrong side.
Will the same character stay consistent?
A reference helps, but inspect the result rather than assuming it is locked. Compare head size, torso length, clothing colors, and accessory placement across the four directions. Then check the feet and the character’s position within each cell.
If the character grows when turning, correct the scale. If the head or clothes change shape, scaling the whole frame will not fix the underlying drawing. Regenerate or edit the affected frames before assembling the final sheet.
Keep the same cell dimensions and alignment throughout. Avoid tightly cropping each frame independently: that can make the character jump around even when the artwork itself is consistent.
How do I prepare and test the walking sheet?
Choose three usable patterns from each direction, with a resting pose in the middle and complementary stepping poses on either side. Simply taking three consecutive frames from a longer loop may produce an uneven walk.
Arrange the twelve cells into the character layout described above. For individual frames, use the sprite sheet maker with three columns and zero padding. Put the files in the intended order and use equal-sized, already aligned frames. Check the final grid; packing cannot repair inconsistent poses.
Copy the finished PNG into your project’s img/characters/ folder. Select it as an actor or event character graphic, then run a playtest on a small map.
Test these behaviors before calling the character finished:
- Walk down, left, right, and up; each direction should display the intended view.
- Stop after moving; the resting pattern should look natural.
- Turn repeatedly; the character should keep a consistent size and foot position.
- Walk near scenery; confirm the scale suits your tiles and the frame does not clip.
If only part of the character appears, check the filename and sheet divisions. If another direction appears during a step, check row order. If the character jitters, inspect alignment and the selected poses.
How much does a complete character cost?
Budget for the whole character, not just the first successful image. Four directions, revisions, and any additional actions can require separate generations. The total depends on the selected mode and how many results need correction.
Check the credit cost shown in the generator before submitting each task, and review current pricing before buying credits. Do not assume an aesthetically disappointing result is the same as a failed generation or will automatically be refunded. Questions about failed tasks or unused credits can be sent to support.
A practical way to limit spending is to settle the design and scale on one direction before creating the others.
Can I use the character in a paid game?
Under SpriteGen’s current Terms of Service, generated sprites may be used in commercial projects; the permission is not limited to purchased credits. You remain responsible for the rights to uploaded references and for avoiding infringement in the final content. Commercial-use permission does not guarantee exclusivity or that every generated design is free of similarity to existing characters.
Start with one character
Make one NPC, prepare its walking sheet, and test it in a small map before generating a full cast. That gives you a concrete reference for scale, style, and the amount of cleanup your project needs.
Create your first character animation with SpriteGen, then use the checks above to turn the result into a tested RPG Maker asset.
Ready to animate your character?
Describe your character, get a game-ready sprite sheet in minutes. Free to start.
Try Sprite Creator →Continue reading
How to Change a Character’s Pose with AI: References and Review
Explore eight archived character-pose experiments with animation previews, full-frame comparisons, bounded successes and honest failures.